Threat Intelligence Configuration
📍 To access Threat Intelligence, go to: Incidents > Threat Intelligence
Overview
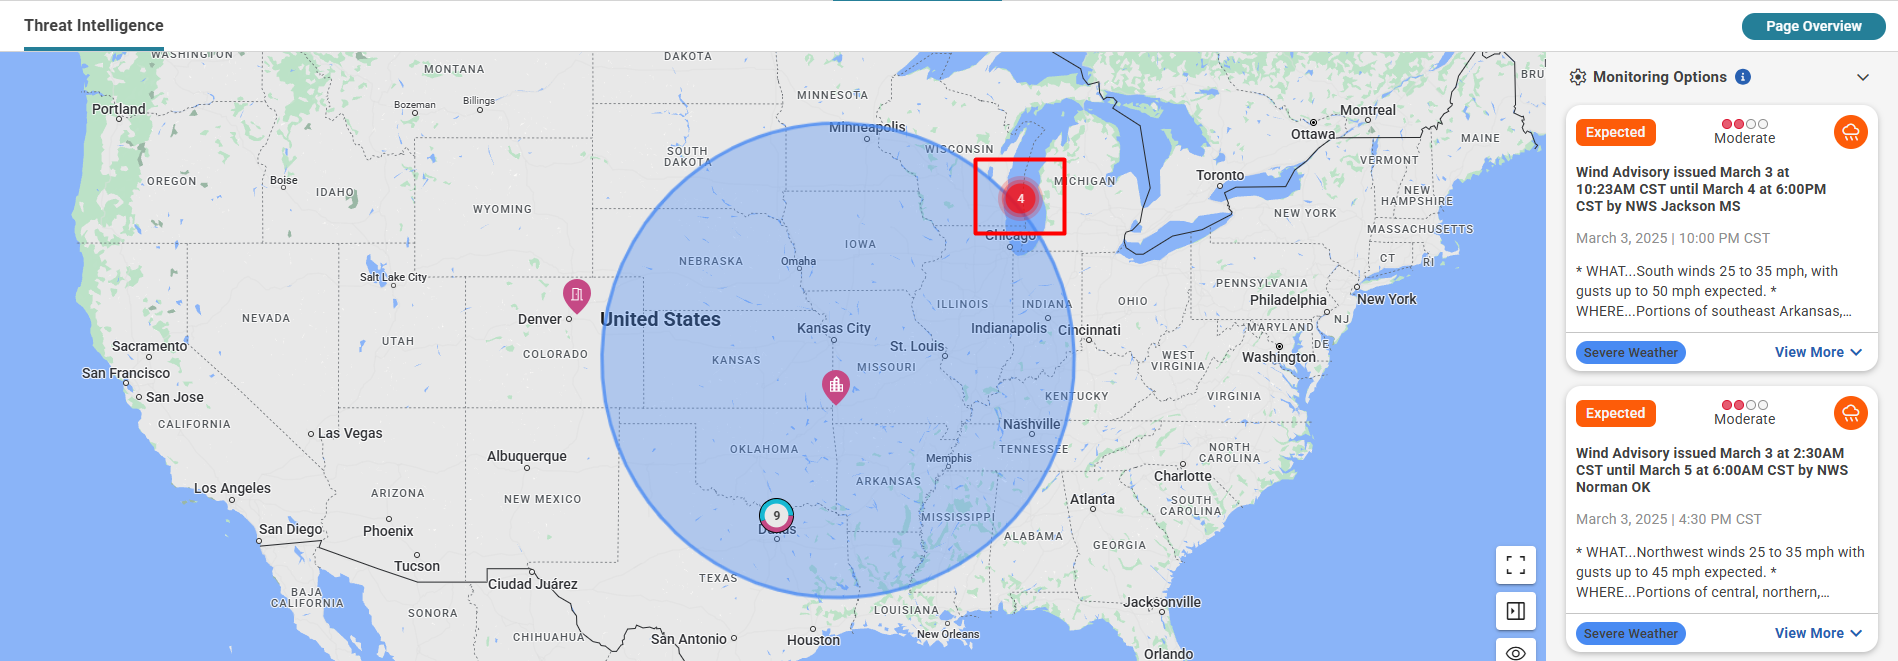
Threat Intelligence in RedFlag provides real-time threat awareness by displaying relevant alerts on an interactive map. This feature helps organizations monitor potential threats and take proactive measures to enhance safety.
To view threats on the interactive map, at least one Monitoring Rule must be configured. Follow the steps below to set up monitoring rules to track relevant threats.
Create A Monitoring Rule
A Monitoring Rule allows you to automatically track and send alerts for specific threats based on defined criteria such as location, severity, urgency, and category.
Example Use Case
- A "Severe Weather" rule can be created with geographic boundaries drawn around areas to monitor for extreme weather conditions.
- This rule can be configured to display threats based on severity and urgency within the Meteorological category.
- Alerts can be automatically sent to a predefined team responsible for severe weather response.
- Additional rules with the same geographic boundaries can be created for Security or Safety categories to notify the appropriate recipients of security-related threats.
By setting up multiple monitoring rules, organizations can ensure the right teams are alerted to threats relevant to their responsibilities.

Configuring a Monitoring Rule
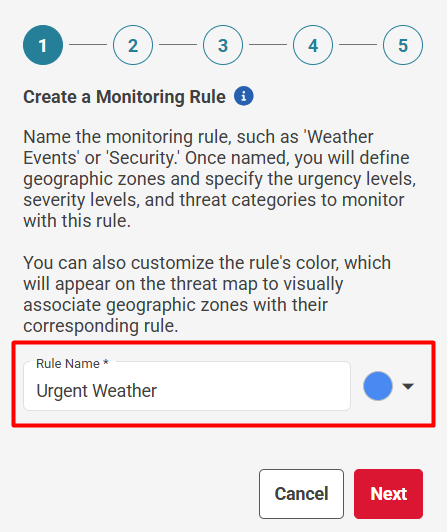
Rule Name and Color
- Assign a name to the rule (max 200 characters).
- Select a color to visually differentiate monitored areas on the map.
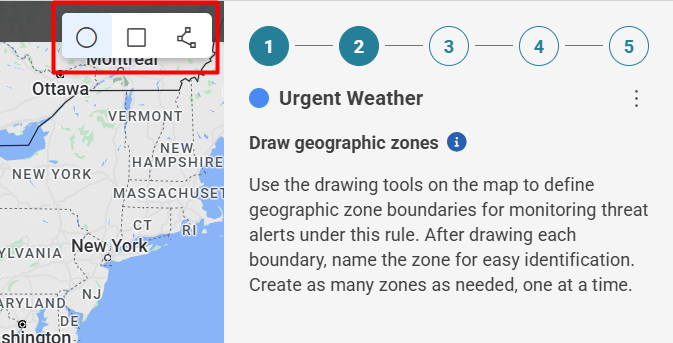
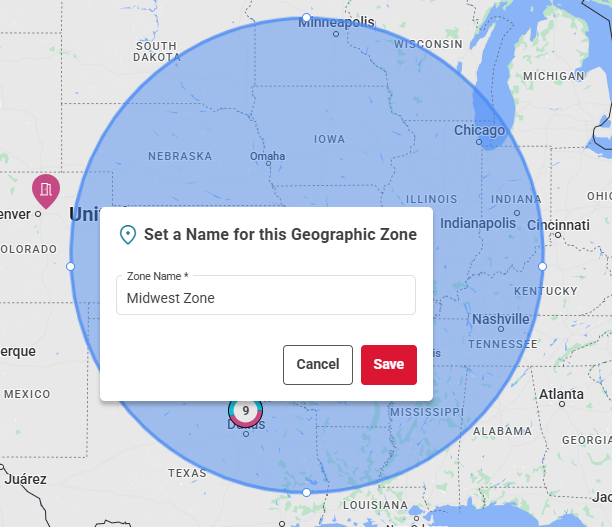
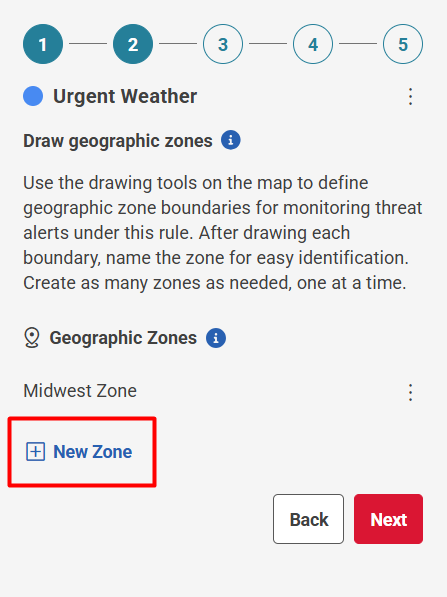
Geographic Zones
- Define geographic zones by drawing boundaries on the map using circle, box, or freeform drawing tools.
- Zones will track relevant threats and trigger alerts based on monitoring rules.
- Currently, geographic zones only monitor threats within the U.S. Zones outside the U.S. will not display threats.
Use the drawing tools on the map to create your zone and assign a name for easy reference (max 200 characters). Once saved, you can add another geographic zone to monitor for the rule or click Next to proceed.
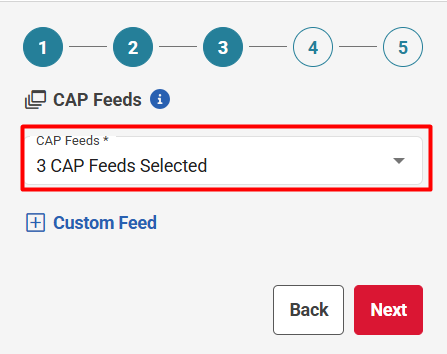
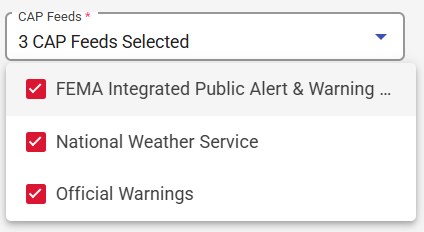
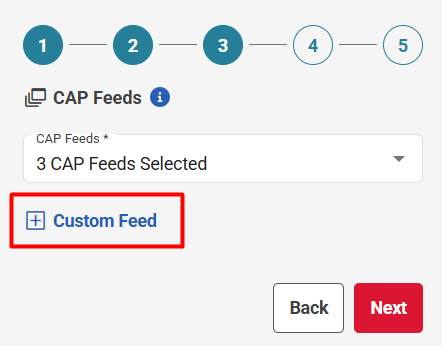
CAP Feeds
CAP Feeds allow you to manage the data sources used for threat monitoring on the interactive map. You can enable or disable preloaded default feeds or add custom CAP feeds to monitor specific threat information relevant to your organization.
Default CAP Feeds
The following CAP feeds are preloaded and available to use:
- FEMA Integrated Public Alert & Warning System (IPAWS)
- National Weather Service (NWS)
- Canadian Weather Feed
You can supplement these with your own custom feeds to extend monitoring coverage as needed.
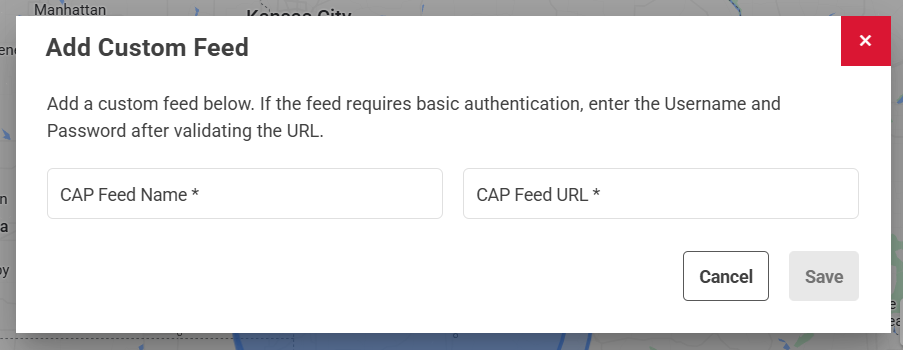
Add Custom Feed
You can add Custom Feeds to monitor threats on the Threat Intelligence map.
- Name the CAP Feed.
- Enter the CAP Feed URL
- The URL must point to a valid syndicated CAP (Common Alerting Protocol) feed.
- If the feed requires Basic Authentication, provide the Username and Password.
After adding the Custom Feed:
- The feed will be included in the Monitoring Rule, along with any other selected feeds.
- The feed will appear under More > Integrations > CAP Feeds, where you can:
- Edit the feed name
- Disable or delete the feed
- Add additional custom feeds
🛡️ Note: The system validates the URL to ensure it points to a valid CAP feed before saving.
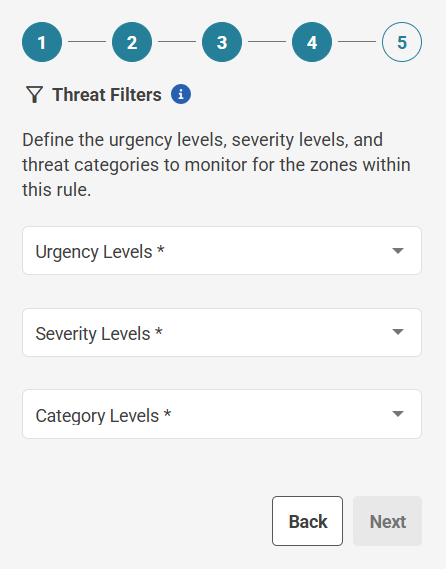
Threat Filters
Select the filters to monitor for the rule. You can filter the threat feed based on Urgency, Severity, or Category.
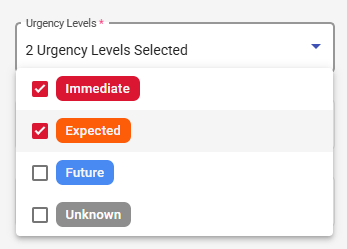
Urgency Levels
- Immediate: Responsive action SHOULD be taken immediately
- Expected: Responsive action SHOULD be taken soon (within next hour)
- Future: Responsive action SHOULD be taken in the near future
- Past: Responsive action is no longer required
- Unknown: Urgency not known
Severity Levels
- Extreme: Extraordinary threat to life or property
- Severe: Significant threat to life or property
- Moderate: Possible threat to life or property
- Minor: Minimal to no threat to life or property
- Unknown: Severity not known
Threat Categories
- Geo: Geophysical (inc. landslide)
- Met: Meteorological (inc. flood)
- Safety: General emergency and public safety
- Security: Law enforcement, military, homeland and local/private security
- Rescue: Rescue and recovery
- Fire: Fire suppression and rescue
- Health: Medical and public health
- Env: Pollution and other environmental
- Transport: Public and private transportation
- Infra: Utility, telecommunication, other non-transport infrastructure
- CBRNE: Chemical, Biological, Radiological, Nuclear or High-Yeld Explosive threat or attack
- Other: Other events
The Threat Categories come directly from trusted external feeds that provide real-time alerts. These categories are assigned by the official source that originally submitted the threat, ensuring that the information reflects how the reporting agency classifies the event.
Since this data comes directly from the source, there may be rare instances where a threat appears under an unexpected category if the submitting agency misclassified it. By delivering the data as provided, RedFlag ensures you receive the most timely and unfiltered information available, allowing you to assess and act based on the full context.
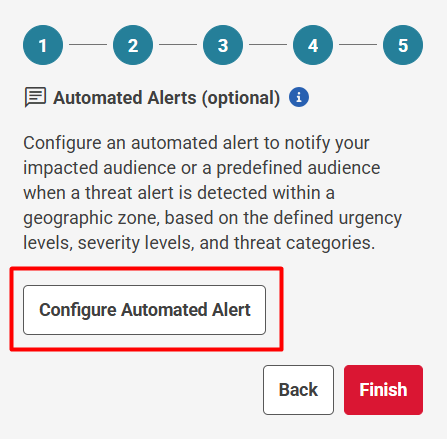
Configure Automated Alerts
Automated Alerts allow your organization to proactively notify audiences when a threat is detected within the geographic zone of a monitoring rule. These alerts can be configured to reach different types of audiences across multiple channels, helping ensure the right people are informed as quickly as possible.
Configuring an Automated Alert
To begin configuration:
- Click Configure Alert under the applicable Monitoring Rule.
You will then be guided through the following setup steps.
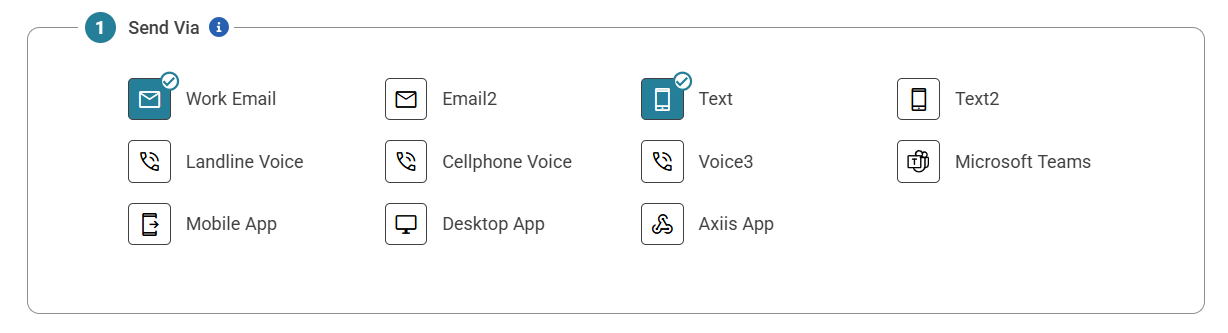
'Send Via' Channels
- Select one or more channels to send the alert through.
- Note: The Voice channel is not currently supported for automated alerts.
- Messages will be sent through all selected channels simultaneously.
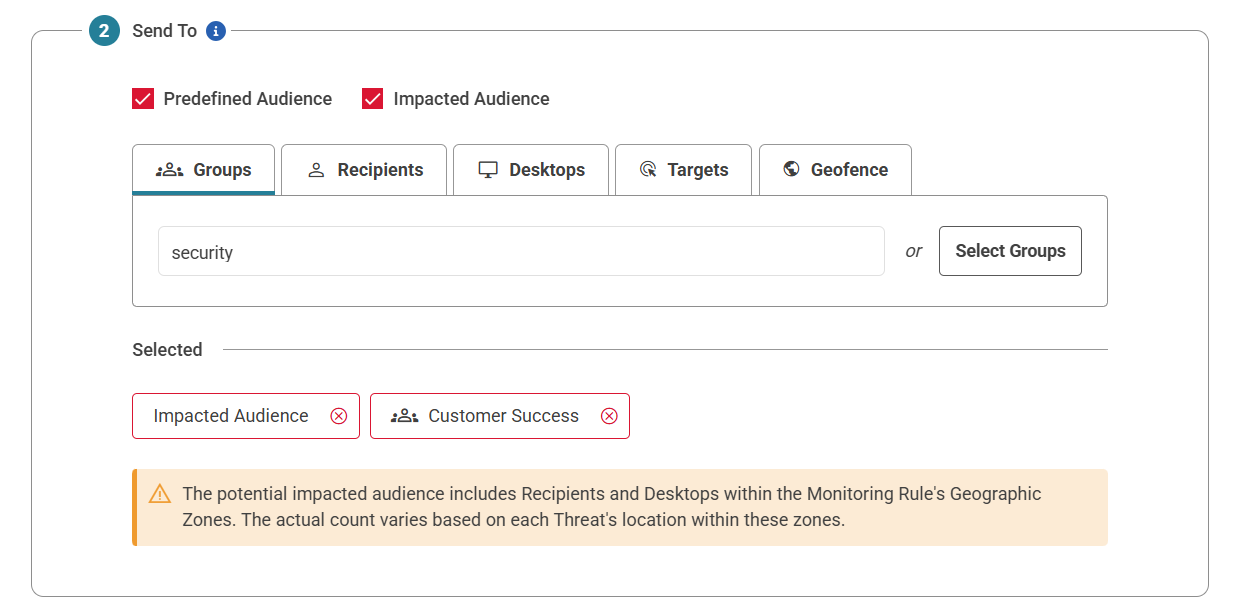
'Send To' Audience
Choose who will receive the alert:
- Predefined Audience: Recipients, Desktops, or Groups that you select in advance.
- Impacted Audience: Profiles whose:
- Address
- Device Location, or
- Group Coordinates
fall within the threat area of the monitoring rule.
You may configure alerts to go to:
- Only the Predefined Audience,
- Only the Impacted Audience, or
- A combination of both.
⚠️ Note: If a profile belongs to multiple selected audiences, they will receive the alert only once per selected channel.
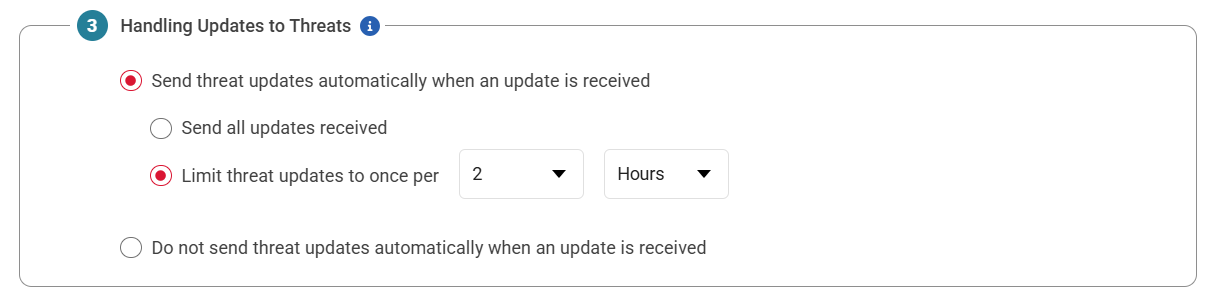
Handling Updates to Threats
RedFlag can receive updates for existing threats via connected threat intelligence feeds. You can control how updates are handled:
Update Options
- Do not send updates: Only the original alert is sent.
- Send updates automatically: Choose between:
- All updates immediately as they are received.
- Limit updates to one per defined interval (e.g., one every 15 minutes).
- The first update is always sent automatically.
- Additional updates during that time window:
- Are not sent automatically
- Appear in the Threat Feed
- Can be sent manually from the threat card.
✅ Threat Cancellations: If a threat is canceled, a cancellation notice will always be sent automatically, regardless of update settings.
This helps balance timely notifications with the need to reduce alert fatigue.
Message Header (Optional)
You can include an optional message header to appear before the standard threat message content.
This can help set context or branding. Example:
“This is an automated alert from our emergency notification system regarding Severe Weather.”

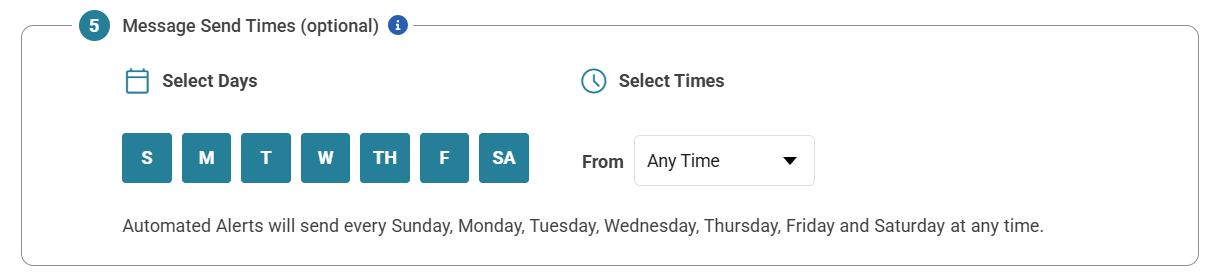
Message Send Times (Optional)
Use this feature to restrict when alerts are sent, preventing delivery during off-hours or outside of active monitoring periods.
- Set one or more send windows (e.g., 8 AM–6 PM on weekdays).
- Alerts will only be sent during those windows.
This helps ensure alerts are delivered when they are actionable and relevant.
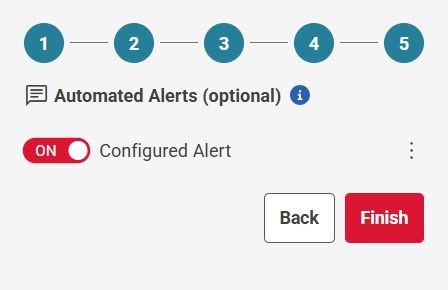
Activation
Once your automated alert configuration is complete:
- Save your settings.
- The alert will remain inactive until you toggle it On within the Monitoring Rule.
 Saving a Monitoring Rule
Once all configurations are set, click Finish at the bottom of the setup screen.
- Any existing threats that match the rule criteria will immediately appear in the Threat Panel.
- Future threats that meet the rule criteria will automatically be displayed as they occur.
- The number of active threats will be shown on the map for each geographic zone where threats are present.
Editing a Monitoring Rule
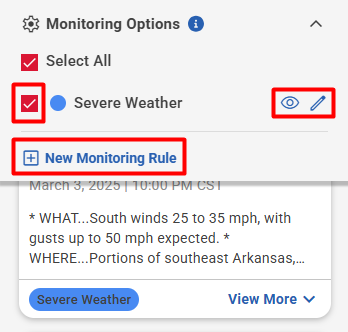
Monitoring Options
- View currently active Monitoring Rules on the map.
- Enable or disable rules to filter the displayed threats.
- Add New Monitoring Rule.
- Click the view (eye) icon next to a rule to zoom into the boundaries of its rule zones.
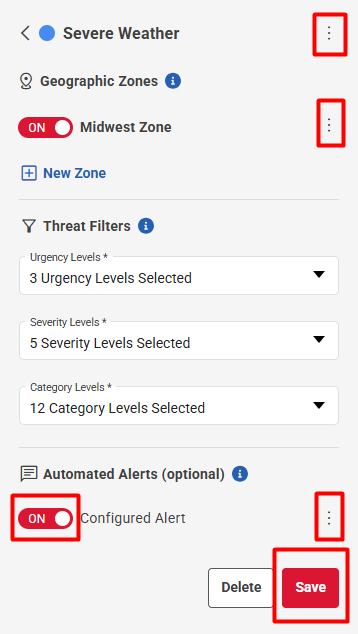
- Click the edit (pencil) icon next to a rule to:
- Rename the rule (click the 3 dot icon beside the rule name)
- Change its color (click the 3 dot icon beside the rule name)
- Adjust geographic zones (click the 3 dot icon beside the zone name)
- Add a new zone
- Modify CAP Feeds
- Modify Severity, Urgency, and Category
- Enable or disable the Configured Alert
- Click the 3 dot icon next to the Configured Alert to:
- Edit the configured alert
- Delete the configured alert
- Delete the rule
Be sure to save changes at the bottom of the panel after editing.