
Add Custom Email Domain
📍 To access Email Domains, go to: More > Setup > Email Domains
Overview
You can customize the email domain your messages are sent from in RedFlag. This allows emails to come from your organization's domain (e.g., alerts@yourdomain.com) rather than the default RedFlag domain.
Default Email Domain
If no custom domain is configured, RedFlag uses its default domain:
- Default From Address:
no-reply@redflaghub.com - Authentication: Already authenticated and ready to use—no setup required
Add a Custom Email Domain
🛡️ Note: You can revert to the default domain at any time by deleting your custom domain using the trash icon in the Email Domains section.
- Navigate to: More > Setup > Email Domains
- Click “Add Custom Email”
- Enter an Email Address under the domain you want to use.
- This must be an email where you can receive a verification code.
- Example:
alerts@yourdomain.com
- Retrieve the Verification Code from your email and enter it into RedFlag.
- Set the Prefix for your custom email address.
- This can be any prefix you’d like, such as
no-reply, oralerts.
- This can be any prefix you’d like, such as
🛡️ Note: You can choose a working or non-working reply address depending on whether you want recipients to respond.
Custom Domain Authentication
To use a custom email domain in RedFlag, the domain must first be authenticated by adding DNS records to your domain provider. Authentication ensures emails are trusted by recipients’ mail servers and helps prevent them from being marked as spam.
Authentication requires adding DNS records for SPF, DKIM, and DMARC. These records validate that RedFlag is authorized to send on your behalf and significantly improve email deliverability.
Authentication Requirements
For a custom domain to be used, it must be authenticated using industry-standard DNS records:
- SPF (Sender Policy Framework): Confirms RedFlag is authorized to send from your domain.
- DKIM (DomainKeys Identified Mail): Adds a digital signature to verify message integrity.
- DMARC (Domain-based Message Authentication, Reporting, and Conformance): Provides additional protection and reporting for spoofing attempts.
Authentication Status
- Needs Authentication – The required DNS records have not been added or verified.
- Authenticated – The DNS records were added and verified successfully. This indicates:
- The domain is fully authenticated.
- Messages are sent from a trusted domain.
- Deliverability is improved and spam risk is reduced.
How to Authenticate Your Domain
- After setting up your custom domain in RedFlag, click Needs Authentication.
- Copy the DNS records displayed in the pop-up.
- Add these records to your domain registrar (e.g., GoDaddy, Namecheap).
- (Optional) Click Send to Coworker to forward the DNS records to someone else for setup.
- Once the records are added, return to RedFlag. Click Needs Authentication, toggle I have added these records to my domain provider settings to Yes, and then click Verify.
- The status will update to Authenticated once the DNS records are verified.
🛡️ Note: RedFlag cannot send emails from your custom domain until it is authenticated.
DNS Record Details
Below are example DNS records showing what the required CNAME records will look like in your domain registrar.
🛡️ Note: These are only examples. Do not use them for your location. Once you add a custom email address in RedFlag under your location, your unique DNS records will display in the pop-up.
Example Records (Do Not Use)
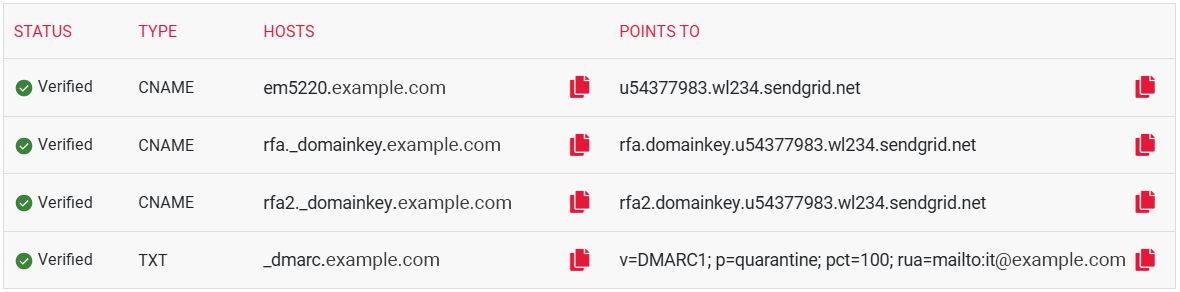
After your unique records are added to your registrar, return to RedFlag and complete verification.
Validation Tools
- DKIM Record: DKIM Check
- DMARC Record: Google DMARC Setup Guide | DMARC Check
IP Address
To ensure reliable delivery of RedFlag email messages, your IT team may need to whitelist the sending IP address associated with our email servers: 167.89.17.161.